Quickstart
Eager to get started? This page gives a good introduction in how to gets started with Flask. This assumes you already have Flask installed. If you do not, head over to the Installation section.
A Minimal Application
A minimal Flask application looks something like that:
from flask import Flask
app = Flask(__name__)

@app.route('/')
def hello_world():
    return "Hello World!"

if __name__ == '__main__':
    app.run()
Just save it as hello.py or something similar and run it with your Python interpreter. Make sure to not call your application flask.py because this would conflict with Flask itself.
$ python hello.py
 * Running on http://localhost:5000/
Head over to http://localhost:5000/, you should see your hello world greeting.
So what did that code do?
- first we imported the
Flaskclass. An instance of this class will be our WSGI application. - next we create an instance of it. We pass it the name of the module / package. This is needed so that Flask knows where it should look for templates, static files and so on.
- Then we use the
route()decorator to tell Flask what URL should trigger our function. - The function then has a name which is also used to generate URLs to that particular function, and returns the message we want to display in the user’s browser.
- Finally we use the
run()function to run the local server with our application. Theif __name__ == '__main__':makes sure the server only runs if the script is executed directly from the Python interpreter and not used as imported module.
To stop the server, hit control-C.
Troubleshooting
The browser is unable to access the server? Sometimes this is unfortunately caused by broken IPv6 support in your operating system, browser or a combination. For example on Snow Leopard Google Chrome is known to exhibit this behaviour.
If the browser does not load up the page, you can change the app.run call to force IPv4 usage:
if __name__ == '__main__':
    app.run(host='127.0.0.1')
Debug Mode
Now that run() method is nice to start a local
development server, but you would have to restart it manually after each
change you do to code. That is not very nice and Flask can do better. If
you enable the debug support the server will reload itself on code changes
and also provide you with a helpful debugger if things go wrong.
There are two ways to enable debugging. Either set that flag on the applciation object:
app.debug = True
app.run()
Or pass it to run:
app.run(debug=True)
Both will have exactly the same effect.
Attention
The interactive debugger however does not work in forking environments which makes it nearly impossible to use on production servers but the debugger still allows the execution of arbitrary code which makes it a major security risk and must never be used on production machines because of that.
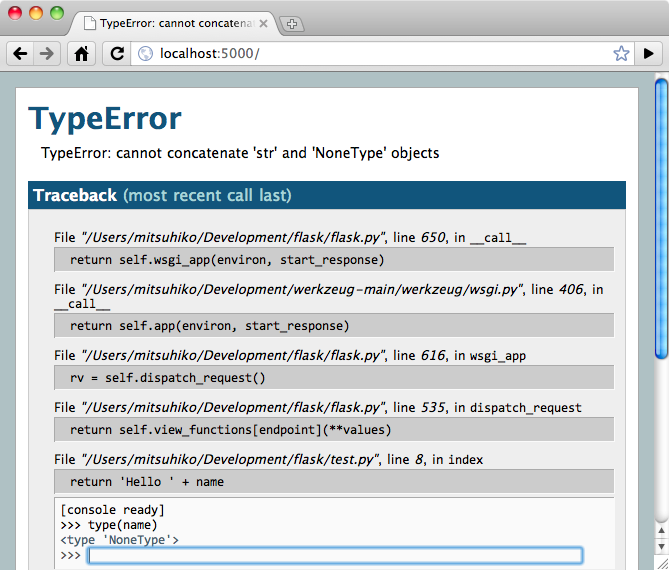
Screenshot of the debugger in action:
Routing
As you have seen above, the route() decorator is used
to bind a function to a URL. But there is more to it! You can make
certain parts of the URL dynamic and attach multiple rules to a function.
Here some examples:
@app.route('/')
def index():
    return 'Index Page'

@app.route('/hello')
def hello():
    return 'Hello World'
Variable Rules
Modern web applications have beautiful URLs. This helps people remember the URLs which is especially handy for applications that are used from mobile devices with slower network connections. If the user can directly go to the desired page without having to hit the index page it is more likely he will like the page and come back next time.
To add variable parts to a URL you can mark these special sections as
<variable_name>. Such a part is then passed as keyword argument to
your function. Optionally a converter can be specifed by specifying a
rule with <converter:variable_name>. Here some nice examples:
@app.route('/user/<username>')
def show_user_profile(username):
    # show the user profile for that user
    pass

@app.route('/post/<int:post_id>')
def show_post(post_id):
    # show the post with the given id, the id is an integer
    pass
The following converters exist:
| int | accepts integers |
| float | like int but for floating point values |
| path | like the default but also accepts slashes |
URL Building
If it can match URLs, can it also generate them? Of course you can. To
build a URL to a specific function you can use the url_for()
function. It accepts the name of the function as first argument and a
number of keyword arguments, each corresponding to the variable part of
the URL rule. Here some examples:
>>> from flask import Flask, url_for
>>> app = Flask(__name__)
>>> @app.route('/')
... def index(): pass
...
>>> @app.route('/login')
... def login(): pass
...
>>> @app.route('/user/<username>')
... def profile(username): pass
...
>>> with app.test_request_context():
...  print url_for('index')
...  print url_for('login')
...  print url_for('profile', username='John Doe')
...
/
/login
/user/John%20Doe
(This also uses the test_request_context() method
explained below. It basically tells flask to think we are handling a
request even though we are not, we are in an interactive Python shell.
Have a look at the explanation below. Context Locals).
Why would you want to build URLs instead of hardcoding them in your templates? There are three good reasons for this:
- reversing is often more descriptive than hardcoding the URLs. Also and more importantly you can change URLs in one go without having to change the URLs all over the place.
- URL building will handle escaping of special characters and unicode data transparently for you, you don’t have to deal with that.
- If your application is placed outside the URL root (so say in
/myapplicationinstead of/),url_for()will handle that properly for you.
HTTP Methods
HTTP (the protocol web applications are speaking) knows different methods
to access URLs. By default a route only answers to GET requests, but
that can be changed by providing the methods argument to the
route() decorator. Here some examples:
@app.route('/login', methods=['GET', 'POST'])
def login():
    if request.method == 'POST':
        do_the_login()
    else:
        show_the_login_form()
If GET is present, HEAD will be added automatically for you. You don’t have to deal with that. It will also make sure that HEAD requests are handled like the HTTP RFC (the document describing the HTTP protocol) demands, so you can completely ignore that part of the HTTP specification.
You have no idea what an HTTP method is? Worry not, here quick introduction in HTTP methods and why they matter:
The HTTP method (also often called “the verb”) tells the server what the clients wants to do with the requested page. The following methods are very common:
- GET
- The Browser tells the server: just get me the information stored on that page and send them to me. This is probably the most common method.
- HEAD
- The Browser tells the server: get me the information, but I am only interested in the headers, not the content of the page. An application is supposed to handle that as if a GET request was received but not deliver the actual contents. In Flask you don’t have to deal with that at all, the underlying Werkzeug library handles that for you.
- POST
- The browser tells the server that it wants to post some new information to that URL and that the server must ensure the data is stored and only stored once. This is how HTML forms are usually transmitting data to the server.
- PUT
- Similar to POST but the server might trigger the store procedure multiple times by overwriting the old values more than once. Now you might be asking why this is any useful, but there are some good reasons to do that. Consider the connection is lost during transmission, in that situation a system between the browser and the server might sent the request safely a second time without breaking things. With POST that would not be possible because it must only be triggered once.
- DELETE
- Remove the information that the given location.
Now the interesting part is that in HTML4 and XHTML1, the only methods a form might submit to the server are GET and POST. But with JavaScript and future HTML standards you can use other methods as well. Furthermore HTTP became quite popular lately and there are more things than browsers that are speaking HTTP. (Your revision control system for instance might speak HTTP)
Static Files
Dynamic web applications need static files as well. That’s usually where the CSS and JavaScript files are coming from. Ideally your web server is configured to serve them for you, but during development Flask can do that as well. Just create a folder called static in your package or next to your module and it will be available at /static on the application.
To generate URLs to that part of the URL, use the special 'static' URL
name:
url_for('static', filename='style.css')
The file has to be stored on the filesystem as static/style.css.
Rendering Templates
Generating HTML from within Python is not fun, and actually pretty cumbersome because you have to do the HTML escaping on your own to keep the application secure. Because of that Flask configures the Jinja2 template engine for you automatically.
To render a template you can use the render_template()
method. All you have to do is to provide the name of the template and the
variables you want to pass to the template engine as keyword arguments.
Here a simple example of how to render a template:
from flask import render_template

@app.route('/hello/')
@app.route('/hello/<name>')
def hello(name=None):
    return render_template('hello.html', name=name)
Flask will look for templates in the templates folder. So if your application is a module, that folder is next to that module, if it’s a pacakge it’s actually inside your package:
Case 1: a module:
/application.py
/templates
    /hello.html
Case 2: a package:
/application
    /__init__.py
    /templates
        /hello.html
For templates you can use the full power of Jinja2 templates. Head over to the Jinja2 Template Documentation for more information.
Here an example template:
<!doctype html>
<title>Hello from Flask</title>
{% if name %}
  <h1>Hello {{ name }}!</h1>
{% else %}
  <h1>Hello World!</h1>
{% endif %}
Inside templates you also have access to the request,
session and g [1] objects
as well as the get_flashed_messages() function.
Templates are especially useful if inheritance is used. If you want to know how that works, head over to the Template Inheritance pattern documentation. Basically template inheritance makes it possible to keep certain elements on each page (like header, navigation and footer).
Automatic escaping is enabled, so if name contains HTML it will be escaped
automatically. If you can trust a variable and you know that it will be
safe HTML (because for example it came from a module that converts wiki
markup to HTML) you can mark it as safe by using the
Markup class or by using the |safe filter in the
template. Head over to the Jinja 2 documentation for more examples.
Here a basic introduction in how the Markup class works:
>>> from flask import Markup
>>> Markup('<strong>Hello %s!</strong>') % '<blink>hacker</blink>'
Markup(u'<strong>Hello <blink>hacker</blink>!</strong>')
>>> Markup.escape('<blink>hacker</blink>')
Markup(u'<blink>hacker</blink>')
>>> Markup('<em>Marked up</em> » HTML').striptags()
u'Marked up \xbb HTML'
| [1] | Unsure what that g object is? It’s something you
can store information on yourself, check the documentation of that
object (g) and the Using SQLite 3 with Flask for more
information. |
Accessing Request Data
For web applications it’s crucial to react to the data a client sent to
the server. In Flask this information is provided by the global
request object. If you have some experience with Python
you might be wondering how that object can be global and how Flask
manages to still be threadsafe. The answer are context locals:
Context Locals
Insider Information
If you want to understand how that works and how you can implement tests with context locals, read this section, otherwise just skip it.
Certain objects in Flask are global objects, but not just a standard global object, but actually a proxy to an object that is local to a specific context. What a mouthful. But that is actually quite easy to understand.
Imagine the context being the handling thread. A request comes in and the webserver decides to spawn a new thread (or something else, the underlying object is capable of dealing with other concurrency systems than threads as well). When Flask starts its internal request handling it figures out that the current thread is the active context and binds the current application and the WSGI environments to that context (thread). It does that in an intelligent way that one application can invoke another application without breaking.
So what does this mean to you? Basically you can completely ignore that
this is the case unless you are unittesting or something different. You
will notice that code that depends on a request object will suddenly break
because there is no request object. The solution is creating a request
object yourself and binding it to the context. The easiest solution for
unittesting is by using the test_request_context()
context manager. In combination with the with statement it will bind a
test request so that you can interact with it. Here an example:
from flask import request

with app.test_request_context('/hello', method='POST'):
    # now you can do something with the request until the
    # end of the with block, such as basic assertions:
    assert request.path == '/hello'
    assert request.method == 'POST'
The other possibility is passing a whole WSGI environment to the
request_context() method:
from flask import request

with app.request_context(environ):
    assert request.method == 'POST'
The Request Object
The request object is documented in the API section and we will not cover
it here in detail (see request), but just mention some of
the most common operations. First of all you have to import it from the
the flask module:
from flask import request
The current request method is available by using the
method attribute. To access form data (data
transmitted in a POST or PUT request) you can use the
form attribute. Here a full example of the two
attributes mentioned above:
@app.route('/login', method=['POST', 'GET'])
def login():
    error = None
    if request.method == 'POST':
        if valid_login(request.form['username'],
                       request.form['password']):
            return log_the_user_in(request.form['username'])
        else:
            error = 'Invalid username/password'
    # this is executed if the request method was GET or the
    # credentials were invalid
What happens if the key does not exist in the form attribute? In that
case a special KeyError is raised. You can catch it like a
standard KeyError but if you don’t do that, a HTTP 400 Bad Request
error page is shown instead. So for many situations you don’t have to
deal with that problem.
To access parameters submitted in the URL (?key=value) you can use the
args attribute:
searchword = request.args.get('q', '')
We recommend accessing URL parameters with get or by catching the KeyError because users might change the URL and presenting them a 400 bad request page in that case is a bit user unfriendly.
For a full list of methods and attribtues on that object, head over to the
request documentation.
File Uploads
Obviously you can handle uploaded files with Flask just as easy. Just
make sure not to forget to set the enctype="multipart/form-data"
attribtue on your HTML form, otherwise the browser will not transmit your
files at all.
Uploaded files are stored in memory or at a temporary location on the
filesystem. You can access those files by looking at the
files attribute on the request object. Each
uploaded file is stored in that dictionary. It behaves just like a
standard Python file object, but it also has a
save() method that allows you to store that
file on the filesystem of the server. Here a simple example how that
works:
from flask import request

@app.route('/upload', methods=['GET', 'POST'])
def upload_file():
    if request.method == 'POST':
        f = request.files['the_file']
        f.save('/var/www/uploads/uploaded_file.txt')
    ...
If you want to know how the file was named on the client before it was
uploaded to your application, you can access the
filename attribute. However please keep in
mind that this value can be forged so never ever trust that value. If you
want to use the filename of the client to store the file on the server,
pass it through the secure_filename() function that
Werkzeug provides for you:
from flask import request
from werkzeug import secure_filename

@app.route('/upload', methods=['GET', 'POST'])
def upload_file():
    if request.method == 'POST':
        f= request.files['the_file']
        f.save('/var/www/uploads/' + secure_filename(f.filename))
    ...
Redirects and Errors
To redirect a user to somewhere else you can use the
redirect() function, to abort a request early with an error
code the abort() function. Here an example how this works:
from flask import abort, redirect, url_for

@app.route('/')
def index():
    return redirect(url_for('login'))

@app.route('/login')
def login():
    abort(401)
    this_is_never_executed()
This is a rather pointless example because a user will be redirected from the index to a page he cannot access (401 means access denied) but it shows how that works.
By default a black and white error page is shown for each error code. If
you want to customize the error page, you can use the
errorhandler() decorator:
from flask import render_template

@app.errorhandler(404)
def page_not_found(error):
    return render_template('page_not_found.html'), 404
Note the 404 after the render_template() call. This
tells Flask that the status code of that page should be 404 which means
not found. By default 200 is assumed which translats to: all went well.
Sessions
Besides the request object there is also a second object called
session that allows you to store information specific to a
user from one request to the next. This is implemented on top of cookies
for you and signes the cookies cryptographically. What this means is that
the user could look at the contents of your cookie but not modify it,
unless he knows the secret key used for signing.
In order to use sessions you have to set a secret key. Here is how sessions work:
from flask import session, redirect, url_for, escape

@app.route('/')
def index():
    if 'username' in session:
        return 'Logged in as %s' % escape(session['username'])
    return 'You are not logged in'

@app.route('/login', methods=['GET', 'POST'])
def login():
    if request.method == 'POST':
        session['username'] = request.form['username']
        return redirect(url_for('index'))
    return '''
        <form action="" method="post">
            <p><input type=text name=username>
            <p><input type=submit value=Login>
        </form>
    '''

@app.route('/logout')
def logout():
    # remove the username from the session if its there
    session.pop('username', None)

# set the secret key.  keep this really secret:
app.secret_key = 'the secret key'
The here mentioned escape() does escaping for you if you are
not using the template engine (like in this example).
Message Flashing
Good applications and user interfaces are all about feedback. If the user does not get enough feedback he will probably end up hating the application. Flask provides a really simple way to give feedback to a user with the flashing system. The flashing system basically makes it possible to record a message at the end of a request and access it next request and only next request. This is usually combined with a layout template that does this.
To flash a message use the flash() method, to get hold of the
messages you can use get_flashed_messages() which is also
available in the templates. Check out the Message Flashing
for a full example.
