Tutorial
You want to develop an application with Python and Flask? Here you have the chance to learn that by example. In this tutorial we will create a simple microblog application. It only supports one user that can create text-only entries and there are no feeds or comments, but it still features everything you need to get started. We will use Flask and SQLite as database which comes out of the box with Python, so there is nothing else you need.
If you want the full sourcecode in advance or for comparison, check out the example source.
Introducing Flaskr
We will call our blogging application flaskr here, feel free to chose a less web-2.0-ish name ;) Basically we want it to do the following things:
- let the user sign in and out with credentials specified in the configuration. Only one user is supported.
- when the user is logged in he or she can add new entries to the page consisting of a text-only title and some HTML for the text. This HTML is not sanitized because we trust the user here.
- the page shows all entries so far in reverse order (newest on top) and the user can add new ones from there if logged in.
We will be using SQlite3 directly for that application because it’s good enough for an application of that size. For larger applications however it makes a lot of sense to use SQLAlchemy that handles database connections in a more intelligent way, allows you to target different relational databases at once and more. You might also want to consider one of the popular NoSQL databases if your data is more suited for those.
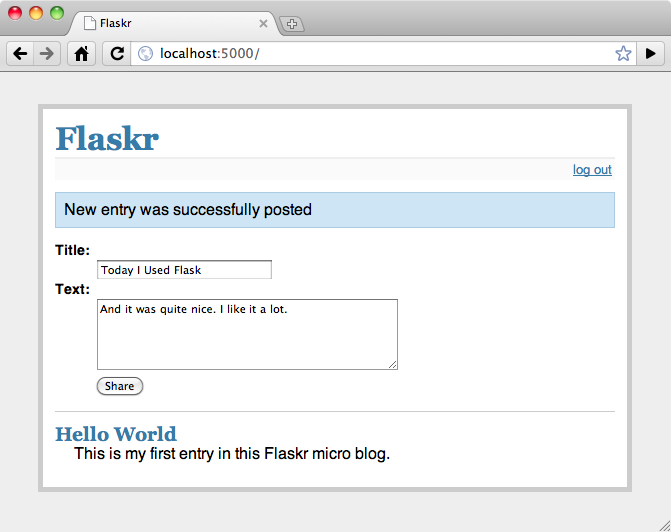
Here a screenshot from the final application:
Step 0: Creating The Folders
Before we get started, let’s create the folders needed for this application:
/flaskr
    /static
    /templates
The flaskr folder is not a python package, but just something where we drop our files. Directly into this folder we will then put our database schema as well as main module in the following steps. The files inside the static folder are available to users of the application via HTTP. This is the place where css and javascript files go. Inside the templates folder Flask will look for Jinja2 templates. Drop all the templates there.
Step 1: Database Schema
First we want to create the database schema. For this application only a single table is needed and we only want to support SQLite so that is quite easy. Just put the following contents into a file named schema.sql in the just created flaskr folder:
drop table if exists entries;
create table entries (
  id integer primary key autoincrement,
  title string not null,
  text string not null
);
This schema consists of a single table called entries and each row in this table has an id, a title and a text. The id is an automatically incrementing integer and a primary key, the other two are strings that must not be null.
Step 2: Application Setup Code
Now that we have the schema in place we can create the application module. Let’s call it flaskr.py inside the flaskr folder. For starters we will add the imports we will need as well as the config section. For small applications it’s a possibility to drop the configuration directly into the module which we will be doing here. However a cleaner solution would be to create a separate .ini or .py file and load that or import the values from there.
# all the imports
import sqlite3
from flask import Flask, request, session, g, redirect, url_for, \
     abort, render_template, flash

# configuration
DATABASE = '/tmp/flaskr.db'
DEBUG = True
SECRET_KEY = 'development key'
USERNAME = 'admin'
PASSWORD = 'default'
Next we can create our actual application and initialize it with the config:
# create our little application :)
app = Flask(__name__)
app.secret_key = SECRET_KEY
app.debug = DEBUG
The secret_key is needed to keep the client-side sessions secure. Choose that key wisely and as hard to guess and complex as possible. The debug flag enables or disables the interactive debugger. Never leave debug mode activated in a production system because it will allow users to executed code on the server!
We also add a method to easily connect to the database specified. That can be used to open a connection on request and also from the interactive Python shell or a script. This will come in handy later
def connect_db():
    return sqlite3.connect(DATABASE)
Finally we just add a line to the bottom of the file that fires up the server if we run that file as standalone application:
if __name__ == '__main__':
    app.run()
With that out of the way you should be able to start up the application without problems. When you head over to the server you will get an 404 page not found error because we don’t have any views yet. But we will focus on that a little later. First we should get the database working.
Troubleshooting
If you notice later that the browser cannot connect to the server during development, you might want to try this line instead:
app.run(host='127.0.0.1')
In a nutshell: Werkzeug starts up as IPv6 on many operating systems by default and not every browser is happy with that. This forces IPv4 usage.
Step 3: Creating The Database
Flaskr is a database powered application as outlined earlier, and more precisely, an application powered by a relational database system. Such systems need a schema that tells them how to store that information. So before starting the server for the first time it’s important to create that schema.
Such a schema can be created by piping the schema.sql file into the sqlite3 command as follows:
sqlite3 /tmp/flaskr.db < schema.sql
The downside of this is that it requires the sqlite3 command to be installed which is not necessarily the case on every system. Also one has to provide the path to the database there which leaves some place for errors. It’s a good idea to add a function that initializes the database for you to the application.
If you want to do that, you first have to import the
contextlib.closing() function from the contextlib package. If you
want to use Python 2.5 it’s also necessary to enable the with statement
first (__future__ imports must be the very first import):
from __future__ import with_statement
from contextlib import closing
Next we can create a function called init_db that initializes the database. For this we can use the connect_db function we defined earlier. Just add that function below the connect_db function:
def init_db():
    with closing(connect_db()) as db:
        with app.open_resource('schema.sql') as f:
            db.cursor().executescript(f.read())
        db.commit()
The closing() helper function allows us to keep a
connection open for the duration of the with block. The
open_resource() method of the application object
supports that functionality out of the box, so it can be used in the
with block directly. This function opens a file from the resource
location (your flaskr folder) and allows you to read from it. We are
using this here to execute a script on the database connection.
When we connect to a database we get a connection object (here called db) that can give us a cursor. On that cursor there is a method to execute a complete script. Finally we only have to commit the changes. SQLite 3 and other transactional databases will not commit unless you explicitly tell it to.
Now it is possible to create a database by starting up a Python shell and importing and calling that function:
>>> from flaskr import init_db
>>> init_db()
Step 4: Request Database Connections
Now we know how we can open database connections and use them for scripts, but how can we elegantly do that for requests? We will need the database connection in all our functions so it makes sense to initialize them before each request and shut them down afterwards.
Flask allows us to do that with the before_request() and
after_request() decorators:
@app.before_request
def before_request():
    g.db = connect_db()

@app.after_request
def after_request(response):
    g.db.close()
    return response
Functions marked with before_request() are called before
a request and passed no arguments, functions marked with
after_request() are called after a request and
passed the response that will be sent to the client. They have to return
that response object or a different one. In this case we just return it
unchanged.
We store our current database connection on the special g
object that flask provides for us. This object stores information for one
request only and is available from within each function. Never store such
things on other objects because this would not work with threaded
environments. That special g object does some magic behind
the scenes to ensure it does the right thing.
Step 5: The View Functions
Now that the database connections are working we can start writing the view functions. We will need four of them:
Show Entries
This view shows all the entries stored in the database. It listens on the root of the application and will select title and text from the database. The one with the highest id (the newest entry) on top. The rows returned from the cursor are tuples with the columns ordered like specified in the select statement. This is good enough for small applications like here, but you might want to convert them into a dict. If you are interested how to do that, check out the Easy Querying example.
The view function will pass the entries as dicts to the show_entries.html template and return the rendered one:
@app.route('/')
def show_entries():
    cur = g.db.execute('select title, text from entries order by id desc')
    entries = [dict(title=row[0], text=row[1]) for row in cur.fetchall()]
    return render_template('show_entries.html', entries=entries)
Add New Entry
This view lets the user add new entries if he’s logged in. This only
responds to POST requests, the actual form is shown on the
show_entries page. If everything worked out well we will
flash() an information message to the next request and
redirect back to the show_entries page:
@app.route('/add', methods=['POST'])
def add_entry():
    if not session.get('logged_in'):
        abort(401)
    g.db.execute('insert into entries (title, text) values (?, ?)',
                 [request.form['title'], request.form['text']])
    g.db.commit()
    flash('New entry was successfully posted')
    return redirect(url_for('show_entries'))
Note that we check that the user is logged in here (the logged_in key is present in the session and True).
Login and Logout
These functions are used to sign the user in and out. Login checks the username and password against the ones from the configuration and sets the logged_in key in the session. If the user logged in successfully that key is set to True and the user is redirected back to the show_entries page. In that case also a message is flashed that informs the user he or she was logged in successfully. If an error occoured the template is notified about that and the user asked again:
@app.route('/login', methods=['GET', 'POST'])
def login():
    error = None
    if request.method == 'POST':
        if request.form['username'] != USERNAME:
            error = 'Invalid username'
        elif request.form['password'] != PASSWORD:
            error = 'Invalid password'
        else:
            session['logged_in'] = True
            flash('You were logged in')
            return redirect(url_for('show_entries'))
    return render_template('login.html', error=error)
The logout function on the other hand removes that key from the session
again. We use a neat trick here: if you use the pop() method
of the dict and pass a second parameter to it (the default) the method
will delete the key from the dictionary if present or do nothing when that
key was not in there. This is helpful because we don’t have to check in
that case if the user was logged in.
@app.route('/logout')
def logout():
    session.pop('logged_in', None)
    flash('You were logged out')
    return redirect(url_for('show_entries'))
Step 6: The Templates
Now we should start working on the templates. If we request the URLs now
we would only get an exception that Flask cannot find the templates. The
templates are using Jinja2 syntax and have autoescaping enabled by
default. This means that unless you mark a value in the code with
Markup or with the |safe filter in the template,
Jinja2 will ensure that special characters such as < or > are
escaped with their XML equivalents.
We are also using template inheritance which makes it possible to reuse the layout of the website in all pages.
Put the following templates into the templates folder:
layout.html
This template contains the HTML skeleton, the header and a link to log in
(or log out if the user was already logged in). It also displays the
flashed messages if there are any. The {% block body %} block can be
replaced by a block of the same name (body) in a child template.
The session dict is available in the template as well and
you can use that to check if the user is logged in or not. Note that in
Jinja you can access missing attributes and items of objects / dicts which
makes the following code work, even if there is no 'logged_in' key in
the session:
<!doctype html>
<title>Flaskr</title>
<link rel=stylesheet type=text/css href="{{ url_for('static', filename='style.css') }}">
<div class=page>
  <h1>Flaskr</h1>
  <div class=metanav>
  {% if not session.logged_in %}
    <a href="{{ url_for('login') }}">log in</a>
  {% else %}
    <a href="{{ url_for('logout') }}">log out</a>
  {% endif %}
  </div>
  {% for message in get_flashed_messages() %}
    <div class=flash>{{ message }}</div>
  {% endfor %}
  {% block body %}{% endblock %}
</div>
show_entries.html
This template extends the layout.html template from above to display the
messages. Note that the for loop iterates over the messages we passed
in with the render_template() function. We also tell the
form to submit to your add_entry function and use POST as HTTP
method:
{% extends "layout.html" %}
{% block body %}
  {% if session.logged_in %}
    <form action="{{ url_for('add_entry') }}" method=post class=add-entry>
      <dl>
        <dt>Title:
        <dd><input type=text size=30 name=title>
        <dt>Text:
        <dd><textarea name=text rows=5 cols=40></textarea>
        <dd><input type=submit value=Share>
      </dl>
    </form>
  {% endif %}
  <ul class=entries>
  {% for entry in entries %}
    <li><h2>{{ entry.title }}</h2>{{ entry.text|safe }}
  {% else %}
    <li><em>Unbelievable.  No entries here so far</em>
  {% endfor %}
  </ul>
{% endblock %}
login.html
Finally the login template which basically just displays a form to allow the user to login:
{% extends "layout.html" %}
{% block body %}
  <h2>Login</h2>
  {% if error %}<p class=error><strong>Error:</strong> {{ error }}{% endif %}
  <form action="{{ url_for('login') }}" method=post>
    <dl>
      <dt>Username:
      <dd><input type=text name=username>
      <dt>Password:
      <dd><input type=password name=password>
      <dd><input type=submit value=Login>
    </dl>
  </form>
{% endblock %}
Step 7: Adding Style
Now that everything else works, it’s time to add some style to the application. Just create a stylesheet called style.css in the static folder we created before:
body            { font-family: sans-serif; background: #eee; }
a, h1, h2       { color: #377BA8; }
h1, h2          { font-family: 'Georgia', serif; margin: 0; }
h1              { border-bottom: 2px solid #eee; }
h2              { font-size: 1.2em; }

.page           { margin: 2em auto; width: 35em; border: 5px solid #ccc;
                  padding: 0.8em; background: white; }
.entries        { list-style: none; margin: 0; padding: 0; }
.entries li     { margin: 0.8em 1.2em; }
.entries li h2  { margin-left: -1em; }
.add-entry      { font-size: 0.9em; border-bottom: 1px solid #ccc; }
.add-entry dl   { font-weight: bold; }
.metanav        { text-align: right; font-size: 0.8em; padding: 0.3em;
                  margin-bottom: 1em; background: #fafafa; }
.flash          { background: #CEE5F5; padding: 0.5em;
                  border: 1px solid #AACBE2; }
.error          { background: #F0D6D6; padding: 0.5em; }
Bonus: Testing the Application
Now that you have finished the application and everything works as expected, it’s probably not the best idea to add automated tests to simplify modifications in the future. The application above is used as a basic example of how to perform unittesting in the Testing Flask Applications section of the documentation. Go there to see how easy it is to test Flask applications.
